Tuesday, March 11, 2014

Make a Moon!

The prettiest luna in the universe 
My daughter loves the moon. LOVES! So here is the easiest project in the galaxy. Color on a paper plate and tape it to the ceiling over your little one's bed. 
This moon has been hanging over T's bed for almost 2 months and she still loves it! She is especially happy with this moon because it never disappears like the fickle moon in the night sky. 

Y paper plates.  

Friday, February 28, 2014

Pretty Easy Fancy Desserts: In Honor of My New Nephew


I have a new nephew! In honor of his birth his proud parents are making a small party for him tonight called a shalom zachorI wanted to make something festive, decorative and yummy for his welcoming that is also easy to transport... so I made chocolate and sprinkle coated marshmallow pops and chocolate cover pretzels. They were not too hard and look O-So-Pretty.

Here is how you too can impress your family and friends.

Fancy Marshmallow Pops
-Lollipop sticks
-Marshmallows
-White chocolate chips
-Sprinkles
-Food coloring

Prep by placing the marshmallows onto the lollipop sticks. This is really simple because the marshmallows are sticky! One of the things I hate about cake pops is trying to get the cake-ball to just stay on the *&#! stick.

Then melt your white chocolate according to the package instructions or be lazy like me and nuke em. I also microwave chocolate on about half power and continuously mix until it is melted. Once the chocolate is melted add food coloring. Then dip your marshmallow and sprinkle away.

Here is a hint - if you are having issues with your chocolate not being as melty and easy to work with as you would like - ADD OIL. Use only canola or vegetable and add a drip at a time until the chocolate is workable. After coating the marshmallows I added more oil to my chocolate mix to thin it out enough so I could place it into a plastic baggie with a tiny hole cut into the side for writing and decorating.

Once you dip, leave the marshmallows to dry on wax paper or a surface that they wont stick to. Wait for them to dry fully and enjoy!


Chocolate Covered Pretzels 
-Pretzel rods
-White chocolate
-Food coloring
To prep, take the pretzels out of the bag. Then melt your white chocolate and add food coloring like you would for the marshmallow pops. Coat the pretzels, I like to use a spoon and load the pretzels up and then scrap off the extra chocolate. Dry on wax paper so you can easily remove the sticks once they cool down.

As I stated above for the decorating and writing add extra oil to your chocolate so it is easier to work with. To make this design I used my left over light blue and added more blue food coloring and oil to the mix, I also needed to microwave it a tad longer so it would remelt. I cut a tiny hole in a small baggie and filled it with chocolate and decorated away.
My disposable decorating bag!
It's too bad my new nephew can't take part in devouring these treats, luckily for him I think his two older siblings and many cousins will eat enough for him too.


Wednesday, February 19, 2014

The Jewish Museum for Free


T in a special exhibit playing with her crayon rubbings from the kids exhibit
The Jewish Museum in located on 92nd and 5th avenue on the Upper East Side. T loves the museum. Really T loves all museums, and because we go the MET the most often, her steady response to the question “what did you see at the museum today” is “TUSHIES!”  Even the Jewish Museum has one Tushie on display so her answer is never wrong.

The Jewish Museum is a small kid friendly museum that has excellent rotating special exhibits. The core exhibition is full of Judaica pieces and Jewish history lessons. We walk around the museum counting the many menorahs, torahs and other Jewish items T is familiar with. The museum also has a really cute children’s exhibit called Archaeology Zone: Discovering Treasures from Playgrounds to Palaces. They have videos, artifacts and lots of activities including a coloring project which is a display wall of “artifacts” for crayon rubbings. There is also a dress up play area and seating area. It is not large, but T was not happy when we told her it was time to move on!

Now here is the BEST part… you can get in for FREE on Shabbat and for a Suggested Donation on Thursdays between 5-8PM.  The kid area is closed on Shabbat and they have a limited amount of electronic media running, but it is a great place to spend a few hours.

*The Jewish Museum can sometimes have a long admission line. I've even seen it snake around the block. If you have a kid – BRING YOUR STROLLER!! Then ask the guard if you can use the ramp and they will let you right in. They will then check your stroller at the coat check and you won’t be bothered by it in the exhibits. It’s a Win-Win!


Check out the current exhibits and hours on the museum’s website - thejewishmuseum.org

Tuesday, February 11, 2014

Under the Sea Birthday Party


Our under the sea themed birthday party was a huge success! And I am so in love with the under the sea decorations that our apartment is going to look like a fish bowl for the foreseeable future. I should probably start renting it out as an event space, think our snotty neighbors would be mad?

If you have an under the sea party coming up I hope the following photos and quick tutorials can help you steal some of these great ideas! 

Decorations
  • I searched google images for under the sea cartoon creatures and then using photoshop colored and sized them to my needs.The most tedious part was cutting each fish out and affixing it to the wall.
  • I made the Happy birthday sign using photoshop as well. I found a photo of water that I liked that had lots of bubbles and was high resolution and then I recolored it and imported into letter outlines I had created. I cut these out for a long time too!
  • The fishes that are hanging from the ceiling are hand-me-downs from my sister's bat mitzvah... she is now 25! 
  • Streamers galore! I used green colored streamers for the seaweed and 3 different color blues for the water hanging from the ceiling.   
    • DO twist the green streamers while making the seaweed
    • DON'T even try to make the blue streamers even, water isn't even and it is not worth your time!
    • DO have someone handing you pieces of pre-cut tape, it will move things along!
I started putting up decorations a week before the party but saved the ceiling for last. When T woke up on Sunday morning I took to see the completed living room. She looked up and then at me with wide eyes and said - WOOOOWWWW!! Totally worth the neck cramps!


Food
I am only going to tell you about the dessert table, because my lunch food was not themed...

Oysters with pearls
    • Buy your favorite stuffed white sandwich cookie. Ours are some no-name store brand and I chose them because I liked the shape
    • Split the cookie in half and remove the cream and set it aside
    • Make/buy frosting. I bought strawberry because it was the perfect pink, it ended up tasting like fluoride from the dentist office, but people ate them up anyway
    • Pipe frosting onto one half of the cookie
    • Shape the cookie cream into a tiny ball and place on top of the pink frosting
    • Add the top half of cookie and you have an oyster!
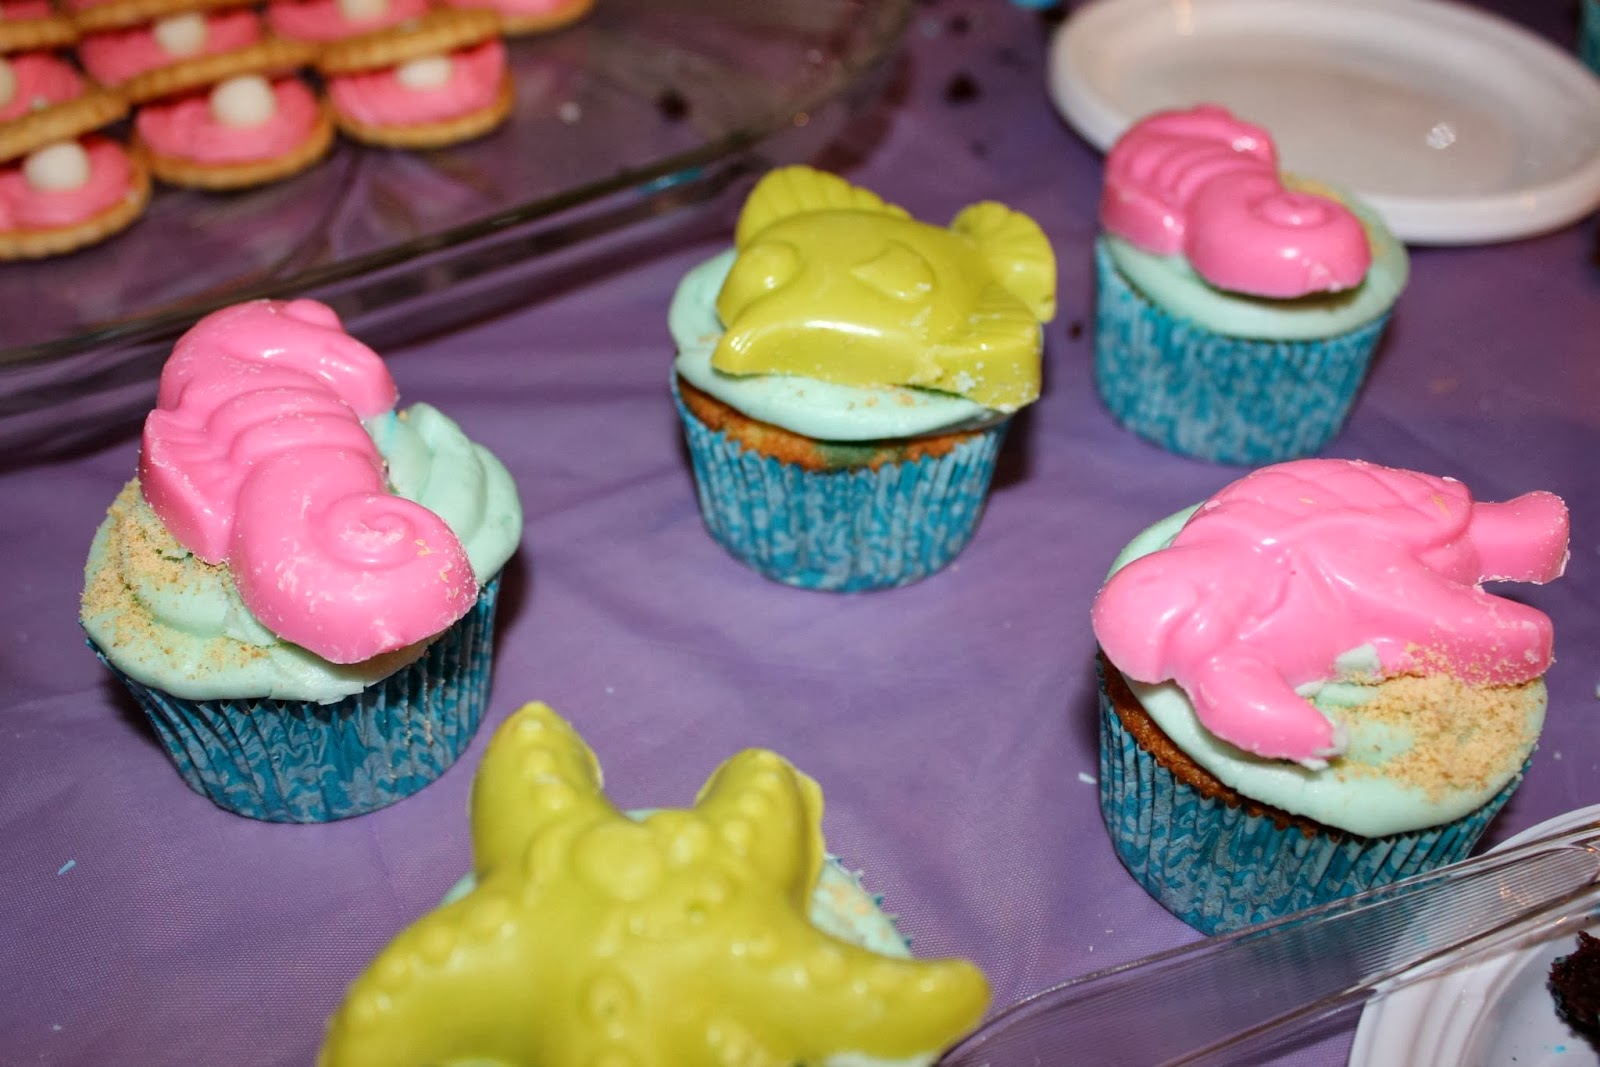
 Sea creature cupcakes
    • Make a vanilla cake mix and fill blue cupcake liners 1/3 the way full. 
    • Add some blue food coloring to the remaining batter and swirl 1 tbsp of blue cake mix into each cupcake so when you bite in, you get a blue surprise
    • Buy or make vanilla/white frosting and tint it a light blue 
    • Fill a zip lock bag with the frosting and cut one of the corners off. This make a very easy piping bag that you don't need to clean!
    • Frost the cupcakes
    • Add crushed graham cracker crumbs to make the sand
    • Buy chocolate melts and an aqua themed mold and make some fun shapes to add to the cupcakes
 Whale Birthday Cake 

    • Bake your kid's favorite flavor cake - for T that means chocolate! Use 2 - 9" round pans and then layer the cakes filling the gap with blue frosting!
    • Make sure that some of the blue frosting goops out of the middle
    • Tint white frosting to make it a light blue
    • Frost the outside of the cake with the light blue frosting, you will notice the darker blue that came out of the sides of the cake mixing to create the water look. Add extra darker blue frosting in little dots and incorporate to give the look of water
    • Use a stencil or free hand the whale 
Water Melon Shark
My dad made this and it came out awesome! 
Arts and Crafts: Octopi and Jellyfish 
Toilet Paper Roll Octopus and Paper Bag Jelly Fish
    • Set out protective floor coverings 
    • Let the kids paint toilet paper rolls and paper bags - use washable paint! 
    • Add googly eyes
    • After the paint dries cut eight legs into the toilet paper roll and bunch of tentacles for the jellyfish
Our new Octopi friends
A Jellyfish Selfie
Having fun making a mess!

Thank you Aunt Davita! This prep takes a team and I could not do this without you.  
Thank you Nana and Auntie Jordana for starting T's obsession with Baby Beluga in the Deep Blue Sea which lead to her fascination with aquatic creatures and ultimately this perfect party. 

Monday, February 3, 2014

Snow Day Snowmen

It is snowing, again. Ugh. It was nice the first time and even the second time, but now it is just getting old. Maybe I would be more thrilled if I didn't have work, but commuting in this weather is the worst. 

Last time we had a lot of snow I left work early and did arts and crafts with T. I found some tissue paper laying around and cut it up into little squares. We crumpled some of the tissue paper up and left some paper flat and got busy gluing our snowmen into existence.  I actually made big circles of glue and let T add the squares and then we layered the glue to make the snowmen look fuller. You can use any background, or glue together paper for a larger canvas like we did. Then it is time to add some personality. You can cut up some colored paper into hats, faces, brooms etc. The blue adornments on our project are actually crafted out of the blue wall-safe painting tape because it was laying out :) This project was super easy and kept us busy for a very long time!! 

Monday, January 27, 2014

Duck Tape Design

If you enlarge this photo you can see the duck tape ridges.
T has lots and lots of books. Even though we have really cute shelving in the living room and two classic shelves in T’s bedroom there always seem to be books spread about. My parents were visiting recently and my mom told me I should put some of the scattered books in a box because our tiny apartment looks messy when anything is out of place. I found a sturdy old shoe box , filled it up some books and set it on a shelf that T could reach. After a week of staring at the ugly shoe box I decided it had to be covered up with something. Duck Tape to the rescue! This project was super easy and made the shoebox totally displayable. Check out all the patterns you can choose from at http://www.duckbrand.com/products/duck-tape/printed-duck-tape. I picked this pattern up 40% of at Michael's and still have enough tape left to cover up a few more boxes! 

Thursday, January 23, 2014

Happy Birthday T! Memories of last year's Cake Smash

Last night I decided to look up when T’s Hebrew birthday falls this year, and I’m sure glad I did because it is today. Happy Hebrew Birthday to my sweet, smart, cunning and hysterical big girl, T!

When T woke up this morning I sang her the Hebrew version on Happy Birthday, Yom Huledet Sameach, and then she immediately asked me for cake. Woops, I guess she already associates cake with her birthday. The association is also probably my fault because last year as soon as T’s birthday rolled around I made her a cake smash! Cake smashes have become increasingly popular and are taking Facebook by storm. Most people hire professional photographers to buy the cake, set up and area, take the photos and clean up the mess- but we did it ourselves. It is a good thing that my husband is used to my crazy by now. He was a really good sport and a big help during the cake smash festivities. If you work together with a partner and own a decent camera – you too can pull off your own cake smash!
A few days before the smash I bought fabric from a store near work for $10. The fabric worked as a perfect background and also helped contain some of the mess.  The night before the festivities began I baked a cake – heavy on the frosting. Next time I do this I will use a whipped cream frosting so there is even more mess!

I set the fabric up by taping it to the wall and floor and set the cake up in the middle. I was slightly insane and even ironed the fabric a little. This was the first and last time I’ve used my iron in the 6+ years I’ve been married. I don’t have professional lighting so I gathered all the lamps in my apartment and set them up along the fabric. I then brought T out to start the smash party!

It didn’t go exactly according the plan. T had never had cake before that day and wasn’t really sure what to make of her surroundings. She ended up poking the cake for a good 10 minutes before Daddy showed her how to dig in. As soon as T shoved her arm into the cake and tasted it she was hooked. The following Sunday at her birthday party she lunged at her birthday cake because she thought she was supposed to smash that one too!  Woops. She is now sweets obsessed, hence this morning’s cake request and last night’s begging for a chocolate milk bottle before bedtime (Don’t worry, I said no- and didn’t cave). I snapped a million photos and some video and we all had the best time. And of course, the mess did not stay contained as hoped. T likes to shake and clap and she loved watching the cake fly everywhere.

I then used photoshop to create a cake smash template to use for a canvas print. It is 20”X20”. This was probably the hardest part of the entire project and I am happily sharing it with you now, it is at the end of the post. If you want me to send you the original PNG or photoshop doc of the template, I will but you will have to start following my blog and leave a comment with your email address and which version you would like. If you know anything about photoshop you should be able to use it. Just crop your photos to fit in the openings and you are done! I also like the idea of including a box or three of text, which is what I did.
If you are a photoshop novice here is a quick tutorial. Load the template into photoshop. I think blogspot will convert this one out of its original PNG format so you then need to use the magic wand tool to remove the white boxes. The image will also download at a much smaller resolution. You will want to click on Image then Image Size and reset your resolution to at least 250/300 before you start adding your photos.You should then use the paint bucket tool to recolor the template to match your photos. I find the best way to get a color you like it to use the eyedropper tool to pick up a color from an actual photo. You will then need to load each individual cake smash photo into the program and crop it to size. Copy and paste each cropped photo into the template over the holes. Lastly move the template to the top of the layers list so it hides all the mess and makes the design look stream lined. Let me know if you can’t follow the above directions and I’ll try to help you out! 

I still think a cake smash is the perfect way to celebrate your little love’s first birthday and introduce them to a world of sweets. Now that T is 2 we will be celebrating with lots of messy projects and yummy treats at her upcoming Bday party!
 
Click on the template to open it in the larger screen and then save the image from there.